Understanding Docker Containerization


Why Docker?
VM vs Containers
VM and Containers provide separate isolated environments for running applications.
VM requires complete OS leading to lot of storage taken whereas Containers are lightweight which includes all dependencies of app, libraries and system dependencies
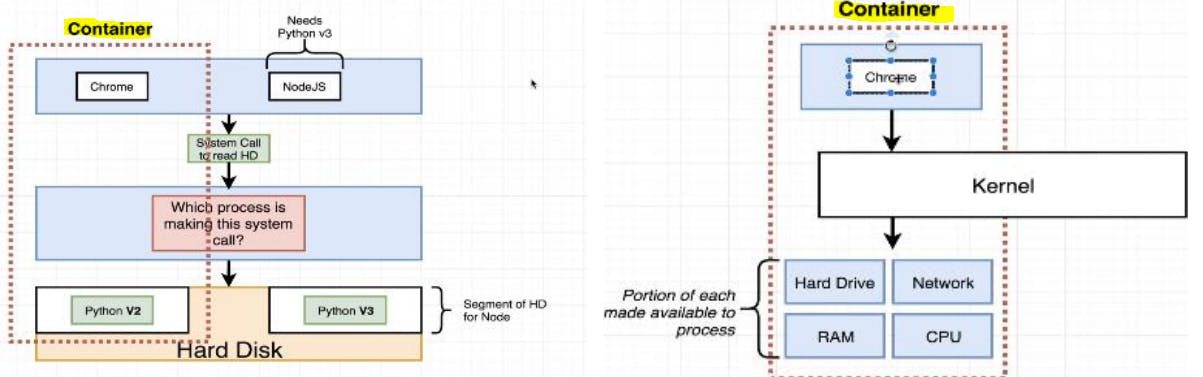
VM run in isolation with their own resources while Containers also run in isolation but share host OS kernel
Both VM and containers - snapshot the current configuration ( allows for easy restoration to a previous point / for creating new instances with same configuration)
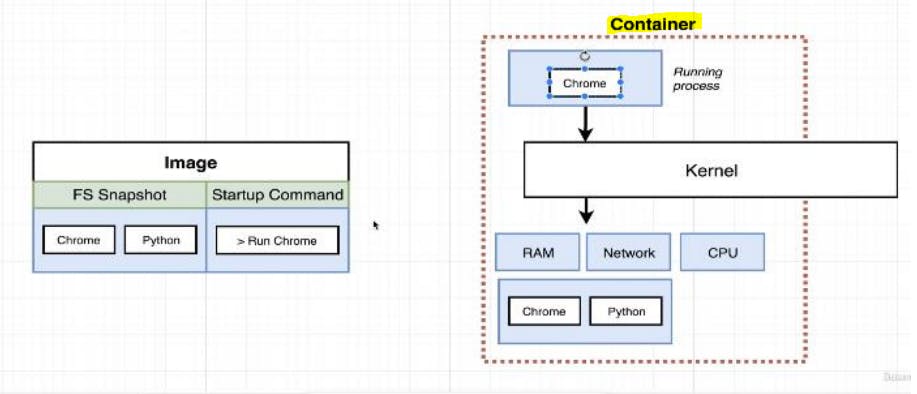
Container provides a runtime environment
Containers can be easily shipped.
DOCKER:
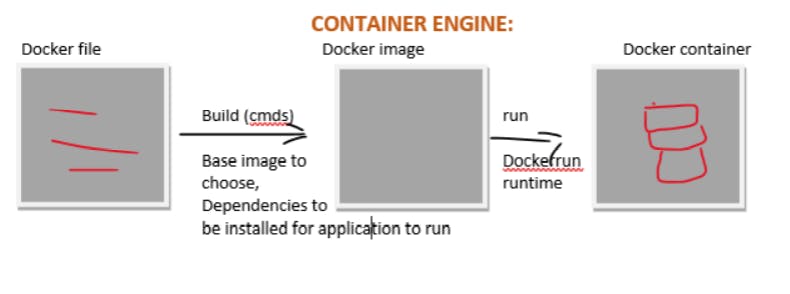
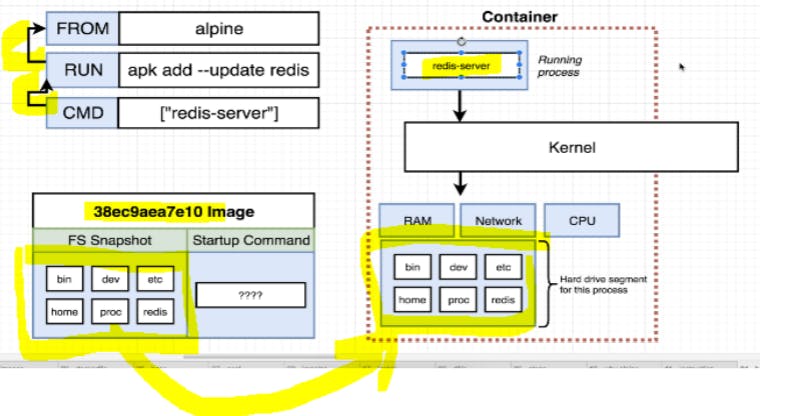
Docker is a containerization platform easy way to containerize the applications, can build container images. Easy to install and run new software without worrying about setup & dependencies. Its a Package software that has everything to run application like libraries, system tools, code etc...
Container: instance of image runs a program.
Docker file: set of instruction to build images.
Docker Client (CLI) - tool that we are going to issue commands
Docker Daemon/Docker server: tool that helps builds image, run container etc..
Namespace - Area of hard drive is for this process where as Control group (C group) - is limit amount of memory the process to be used, CPU, Network, HD I/O
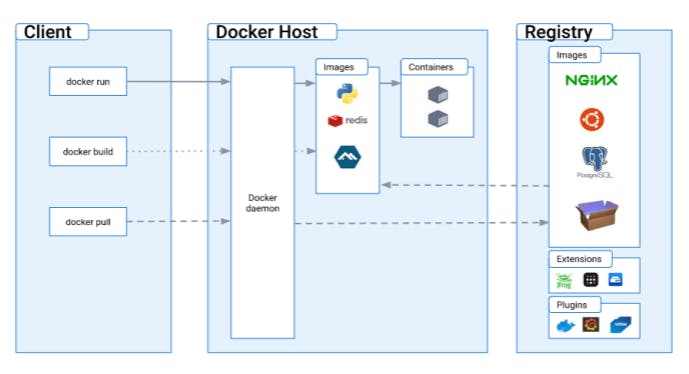
Docker images: snapshots of libraries & dependencies of application to run in a container
Docker daemon: Background process that manages docker images, containers, network & storage volumes.
Docker client: command line to interact with daemon
Docker registry: holds all the versions of a specific image. Users can pull locally and push images to registry.
Files and folders in base image:
/bin - binary executable files (Is,cp)
/sbin - system binary executable files (init, shutdown button)
/etc - configuration files for various system service
/lib - library files that are used by binary files
/usr - user relate files (application)
/var - variable data(log files
/root -home direct for root user
These above files provide logical isolation from one container to another container.
Files & folders from host OS:
-host file system (address network node in a computer network(IP address), text file used to map host name, IP address)
-Networking stack - provide network
-system calls - Containers interact with host's kernel through system call interface
-Namespaces - Docker container use Linux namespace to create isolation(file system, process ID, network)
-control group - limit/control resources amount(CPU, memory, I/O) that containers should access
Installing Docker on ubuntu in Aws
Updating package index
Step 1: sudo apt-get update
Installing docker
Step 2: sudo apt-get install docker.io -y
Starting the docker service
Step 3: sudo systemctl startlocker
Step 4: sudo docker run hello-world
Step 5: docker-version
Add user to docker group - to use docker cmd without 'sudo' :sudo usermod -a -G docker $(whoami)
activate changes without logging out:newgrp docker
enabling docker service - sudo systemctl enable docker
Troubleshoot:
docker images
permission denied while trying to connect to the Docker daemon socket at unix:///var/run/docker.sock: Get "http://%2Fvar%2Frun%2Fdocker.sock/v1.24/images/json": dial unix/var/run/docker.sock: connect: permission denied
solved by: sudo chmod 666 /var/run/docker.sock
Steps to setup EC2 instance locally using SSH:
step 1:ssh-keygen -t rsa -b 4096 -C thil--a---@gmail.com
chmod 600 <keypair>.pem
step 2:ssh -i path/to/key/keypair.pem ec2@54.2fg3.168.20x
ssh -i /path/to/key-pem <ubuntu/ec2 instance>@<54.86/public key>
Dockerfile creation, building images, container creation and pushing to registry.
Step 1: create a Dockerfile
FROM ubuntu:latest
# Update the package repository
RUN apt-get update
Step 2: Build Docker Image
Build the Docker image using the docker build command:
docker build -t <IMAGE-NAME>:<TAG> <PATH-TO-THE-DOCKERFILE>
Example: docker build -t thilaga-image:latest /path/to/sampledockerfile
Step 3: Create Container from Image
Once the image is built, use the docker run command to create a container from the created image:
docker run -d --name <CONTAINER-NAME> -it <IMAGE-NAME/ID>
Eg: docker run -d --name cont1 -it thilaga-image
Step 4: Login to Container
Login to the container using the docker exec command:
docker exec -it <CONTAINER-NAME/ID> <TYPE-OF-LOGIN>
# Ping another container
Ping cont2
Example: docker exec -it cont1 bash
Inside the container:
Step 5: Docker Login and Push
Login to Docker Hub using the docker login command, then push the image to Docker Hub:
Docker login
docker push <USERNAME>/<IMAGE-NAME>
Example: docker push thilaga/thilaga-image
Basic commands which would help:docker ps: List currently running containers.docker ps -a: List all containers, including those that have exited.docker images: List all active images.docker inspect <contname>: Retrieve specific details about a container.docker network ls: List Docker network bridges.docker network inspect <bridge_sample>docker network rm <bridge_sample> docker stop <cont_id> docker rm <cont_name> docker rmi <image_name> docker logs <container_id>: Retrieve logs generated by a specific container.docker system prune: Clean up Docker environment by removing stopped containers, unused networks, dangling images, and build cache.
Docker swarm - Docker is a platform where you can create container and run in isolation manner whereas docker swarm is used to manage and orchestrate containers.
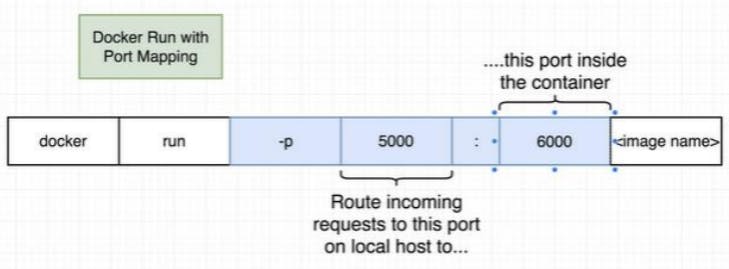
Container port mapping
docker run -p 5000:6000 <image name>
Multi-container Docker environment
One container talk to other container using Network bridge
Docker compose:
There are different tools plays role in docker
1. Docker machine
2. Docker compose - tool for running multi container docker applications
3. Docker swarm - a native clustering solution for docker
4. Kubernetes - open source tool for automating deployment, scaling and application code